
Safety Harness Fitting Guide for Climbing and Roof Work
A safety harness is only as good as its fit. You can invest in the highest-rated fall protection equipment on the market, pair it with a certified anchor point and a top-quality self-retracting lifeline, and still put a worker at serious risk if the harness isn't fitted correctly. An improperly fitted harness can slip off during a fall, concentrate arrest forces on the wrong parts of the body, or leave a worker in a position where suspension trauma sets in within minutes of an incident.
Yet across construction sites, roofing crews, utility operations, and industrial facilities every day, workers clip into harnesses that haven't been properly adjusted — sometimes because they weren't trained, sometimes because they're sharing equipment sized for someone else, and sometimes because the culture around harness fitting is casual when it should be rigorous.
This climbing harness fitting guide covers everything workers and safety managers need to know: how a safety harness works, how to select the right harness, how to fit and adjust it correctly, how to inspect it before use, and how to recognize when a harness needs to be retired. Whether you're working at height on a construction project, maintaining a roof, or managing fall protection compliance for your organization, getting harness fitting right is foundational to everything else.
How a Safety Harness Works: The Basics of Fall Arrest
Before fitting a harness correctly, it helps to understand what the harness is actually doing during a fall arrest event. A full-body safety harness is designed to distribute the forces generated when a falling worker is stopped by their fall arrest system across the strongest parts of the body — the thighs, pelvis, chest, and shoulders. This distribution is critical because the deceleration forces during a fall arrest can be significant, and concentrating them on any single area — particularly the waist, as a body belt does — can cause severe internal injuries.
The dorsal D-ring, located between the shoulder blades on the back of the harness, is the primary attachment point for fall arrest. This positioning ensures that when arrest occurs, the worker is oriented upright and the forces travel through the harness in the way it was designed. Some harnesses include a sternal D-ring on the front chest panel, used for positioning and restraint systems, and side D-rings at the hip, used for positioning work. These rings serve different purposes and should not be used interchangeably with the dorsal ring for fall arrest unless the harness manufacturer and the system design specifically permit it.
Choosing the Right Safety Harness
Harness Types and Classifications
Not all safety harnesses are the same. Full-body harnesses — the only type approved for fall arrest under OSHA standards — come in several configurations suited to different work environments and tasks.
General-purpose harnesses are the most common type found on construction and general industry job sites. They include a dorsal D-ring, chest and leg straps, and basic adjustment hardware. They are appropriate for the majority of elevated work tasks.
Positioning harnesses add side D-rings that allow the worker to lean back into the harness while working with both hands free — common in steel erection, ironwork, and utility pole climbing. Climbing harnesses designed specifically for tower, communication structure, and utility work are built for the demands of frequent climbing, often with additional padding, front attachment points, and compatibility with work positioning lanyards.
Specialty harnesses exist for confined space rescue operations, full suspension work such as window washing and rope access, and specific industrial applications. Selecting the harness type appropriate to the task is step one — a general-purpose harness is not the right tool for every elevated job.
Safety Harness Sizing and Weight Ratings
Safety harnesses are manufactured to fit a range of body sizes, typically indicated by chest and waist measurements or by small/medium/large/extra-large designations. Always check the manufacturer's sizing chart — a harness that falls outside the recommended size range for a worker cannot be adjusted to fit correctly and should not be used. Forcing adjustment straps to their maximum or minimum limits to accommodate an out-of-range body size compromises the geometry of the harness and its ability to distribute arrest forces correctly.
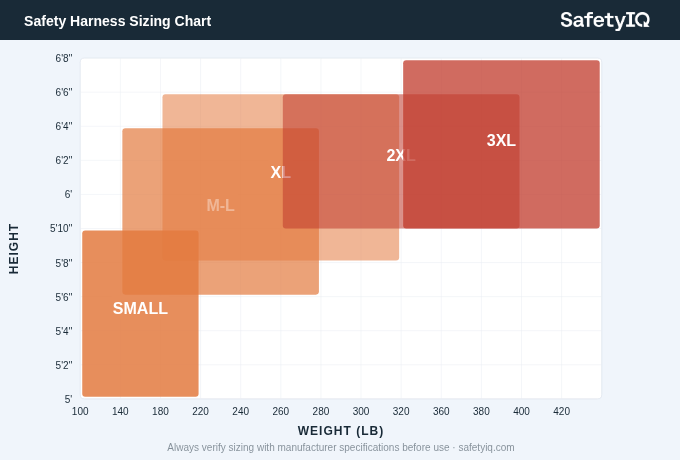
Every harness carries a weight rating — most standard harnesses are rated for workers up to 310 pounds (140 kg) including tools and equipment. Harnesses rated for higher weights are available and must be selected when the combined worker and equipment weight exceeds the standard limit. Using a standard-rated harness on a worker whose combined load exceeds the rating is a serious safety violation and a potentially fatal error.
Step-by-Step: How to Fit a Safety Harness Correctly
This is the core of any climbing harness fitting guide, and the steps should be followed in sequence every time a harness is donned — not just the first time it's used.
Step 1: Inspect Before You Don
Before putting the harness on, inspect it. This is covered in more detail in the inspection section below, but the sequence matters: you should never begin fitting a harness that hasn't been inspected. Check the webbing for cuts, abrasion, discoloration, and stiffness. Check all hardware — buckles, D-rings, and adjustment slides — for deformation, cracks, and corrosion. Confirm the label is legible and shows no indication that the harness has been removed from service.
Step 2: Hold and Orient the Harness
Pick the harness up by the dorsal D-ring and let it hang freely. This allows all the straps to fall into their correct positions and makes it easy to identify the chest strap, shoulder straps, and leg straps before donning. Confirm the dorsal D-ring is at the top, the leg straps hang below, and no straps are twisted.
Step 3: Don the Shoulder Straps
Slip both arms through the shoulder straps as you would a backpack. The shoulder straps should sit flat on the shoulders — not cutting into the neck, not sliding off toward the arms. If there is a chest strap connecting the two shoulder straps across the sternum, it should rest across the middle of the chest, roughly at mid-sternum height. Adjust the chest strap so it is snug but not compressing the chest — you should be able to breathe freely and comfortably.
Step 4: Connect and Adjust the Leg Straps
Reach down and connect each leg strap buckle between the legs. Leg straps should route under the buttock and up through the groin area on each side — this positioning is essential for the harness to function correctly during fall arrest. Poorly routed leg straps that sit on the front of the thighs instead of under the buttock will fail to keep the worker upright during a fall.
Once connected, adjust each leg strap so it is snug. The standard fit check is the two-finger rule: you should be able to slide two fingers — and no more — under the leg strap. If the strap is loose enough to fit a full hand underneath, it is too loose. If you cannot fit two fingers, it is too tight and will restrict circulation and movement. Perform this check on both legs independently — leg strap adjustments are not always symmetrical, particularly on workers with different proportions.
Step 5: Adjust the Shoulder Straps
With the leg straps connected and snug, adjust the shoulder straps so the dorsal D-ring sits between the shoulder blades — approximately at mid-back height or slightly higher. If the D-ring is riding up toward the back of the neck, the shoulder straps are too long. If it is pulling down toward the lower back, the shoulder straps are too short. The D-ring position determines where the arrest forces will be applied and where the worker will be oriented after a fall, so this adjustment is not cosmetic — it directly affects harness performance.
Step 6: Tuck All Excess Webbing
Excess webbing that is not secured through the keeper loops can catch on equipment, obscure the worker's vision, or create entanglement hazards. After all adjustments are made, feed excess strap length back through the keeper loops on each strap. The harness should look neat and orderly — loose webbing flapping around a job site is a sign of improper fitting.
Step 7: Perform the Final Fit Check
Stand up straight, raise your arms, and move naturally — simulate the range of motion the job requires. The harness should move with you without the straps pulling tight, shifting position, or riding up. Have a co-worker or supervisor confirm the dorsal D-ring position, check that leg straps are properly routed, and verify no straps are twisted. This buddy check is a best practice that should be built into the pre-work routine on any job site where harnesses are used.
Roof Safety Harness Considerations
Working on a roof introduces specific harness fitting and usage considerations beyond general elevated work. Roof safety harness systems typically involve the harness connected to a roof anchor via a self-retracting lifeline or a shock-absorbing lanyard, and the configuration of the system determines the maximum fall distance — a critical calculation for roof work where the distance to the roof edge and from the roof to the ground below must be factored into system selection.
Fall Clearance Calculation
A harness and lanyard system does not stop a worker instantly — there is a free fall distance before the system engages, a deployment distance as the energy absorber activates, and the worker's own height contributing to the total fall distance. A six-foot shock-absorbing lanyard on a worker who is six feet tall and falls from an anchor point at waist height can result in a total fall distance of 18 feet or more before the worker comes to rest. On low-slope roofs with limited working height above grade, this calculation must be verified before the system is deployed. Where clearance is insufficient for a standard lanyard, self-retracting lifelines with shorter total fall distances may be required.
Anchor Point Selection for Roof Work
The harness is only as reliable as the anchor it's connected to. Roof anchors must be capable of supporting 5,000 pounds per attached worker, or must be designed and installed by a qualified person as part of a certified fall protection system. Temporary roof anchors should be installed according to manufacturer instructions for the specific roofing material — installation methods for metal roofing, asphalt shingles, and membrane roofing differ significantly. Never anchor to HVAC equipment, pipe penetrations, or rooftop structures that have not been evaluated for use as anchor points.
Inspecting a Safety Harness: What to Look For
Pre-Use Inspection
Every harness should be inspected by the worker before each use. The safety inspection takes less than two minutes and should become as automatic as buckling a seatbelt. Inspect the webbing by running it slowly through your hands, feeling and looking for cuts, abrasion damage, heat damage, chemical contamination, and UV degradation. Webbing that is stiff, brittle, discolored, or shows any surface damage should be removed from service immediately.
Inspect all metal hardware — D-rings, buckles, and adjustment slides — for distortion, cracks, sharp edges, and corrosion. D-rings should move freely without excessive play. Buckles should engage and release cleanly. Inspect all stitching, particularly at load-bearing connection points, for broken threads, fraying, or elongation that indicates the stitching has been stressed.
Annual Competent Person Inspection
In addition to pre-use worker inspection, OSHA and harness manufacturers recommend a formal inspection by a competent person at least annually. A competent person inspection goes deeper than the pre-use check — examining hardware for subtle deformation, checking webbing against original color standards for UV degradation, and reviewing the harness record for any documented events that might affect serviceability.
When to Retire a Harness
Any harness that has arrested a fall must be immediately removed from service, regardless of visible condition. The forces generated during fall arrest stress the harness in ways that may not be externally visible but compromise its ability to perform in a subsequent event. Mark the harness clearly as out of service — do not rely on verbal communication alone, as a marked harness left in the storage area cannot be accidentally redeployed. Other automatic retirement triggers include chemical contamination, heat exposure, any cut or nick in the webbing, deformed or cracked hardware, and any harness that cannot be positively identified as within its service life due to missing or illegible labeling.
Common Safety Harness Fitting Mistakes
Even experienced workers fall into patterns that compromise harness fit. The most common errors seen on job sites include: leg straps left too loose, particularly on workers who have adjusted the harness for comfort during long wear; the dorsal D-ring riding too low due to shoulder straps not being tightened after donning; twisted webbing that was not caught before donning; and harnesses shared between workers of significantly different sizes without full re-adjustment between uses.
The harness-sharing issue deserves particular emphasis. When multiple workers share a harness across shifts, there is a persistent tendency for each worker to make partial adjustments rather than fully re-fitting the harness from scratch. The result is a harness that fits no one correctly. Where shared equipment is unavoidable, a laminated fitting card attached to the harness with step-by-step re-fitting instructions for each strap is a simple intervention that improves compliance.
Safety Harness: Frequently Asked Questions
How tight should a safety harness be, and how do I know if mine is fitted correctly?
The two-finger rule is the universal standard for safety harness fit assessment, and it applies to every strap on the harness — shoulder straps, chest strap, and leg straps alike. After adjusting each strap, try to slide two fingers flat under it. If you can slide two fingers comfortably but cannot fit a third, the strap is correctly tensioned. If you can fit your entire hand under the strap, it is dangerously loose — in a fall arrest scenario, a loose leg strap can allow the worker to partially slip through the harness, and a loose shoulder strap allows the dorsal D-ring to shift position so that arrest forces are not distributed as designed. If you cannot fit even two fingers under the strap, it is too tight — circulation to the legs can be restricted, and range of motion required for the work may be compromised. Beyond the two-finger check, perform a movement test: raise your arms overhead, squat down, and rotate your torso. The harness should move with your body without any strap pulling taut or the dorsal D-ring shifting significantly from its position between the shoulder blades. If the harness passes the two-finger check on every strap and passes the movement test, it is correctly fitted. If you are uncertain, stop and have a trained co-worker or supervisor verify the fit before beginning elevated work.
Can I share a safety harness with other workers, and if so, what do I need to do before using it?
Sharing safety harnesses is permitted under OSHA standards provided the harness is properly re-fitted and re-inspected each time it changes users. In practice, harness sharing introduces real safety risks that employers should be aware of. The primary risk is incomplete re-adjustment — when a worker inherits a harness adjusted for someone of a different size and makes only partial adjustments, the result is a harness that does not fit correctly and will not perform as designed in a fall. If sharing is unavoidable, establish a policy requiring that every strap be fully loosened and re-adjusted from scratch each time the harness changes hands, following the full donning procedure. Attach a laminated quick-reference fitting guide to the harness. Do not permit workers to simply "tweak" adjustments made for the previous user. Inspect the harness before each use regardless of who used it last — you cannot rely on the previous user's inspection. In environments with significant variation in worker body size, investing in multiple harnesses in different sizes eliminates the fitting risks of sharing and is strongly recommended. Never share a harness that has been involved in a fall, shows any signs of damage, or has a missing or illegible inspection tag.
How often does a safety harness need to be replaced, and what is its service life?
Safety harness service life is not defined by a universal fixed interval. OSHA does not mandate a specific replacement timeline, and manufacturer guidance varies — some manufacturers specify a maximum service life of five to ten years from the date of manufacture regardless of condition, while others require replacement based on inspection findings rather than age alone. The definitive retirement triggers are clear: any harness that has arrested a fall must be immediately removed from service and destroyed or rendered unusable. Any harness showing webbing damage, hardware damage, or chemical or heat contamination must be retired. Beyond these event-based triggers, age and UV degradation are real factors — harnesses used outdoors in high-UV environments degrade more quickly than those used indoors, and the inspection record should reflect this. Best practice is to follow the manufacturer's stated service life, conduct annual competent person inspections, maintain a written record of each harness's purchase date, use history, and inspection results, and retire any harness where the condition is uncertain. When in doubt, replace it — the cost of a new harness is negligible compared to the cost of a fall.
What is suspension trauma, and why does it matter for harness users?
Suspension trauma — also called harness-induced pathology or orthostatic intolerance — is a serious and potentially fatal condition that can develop when a worker is left suspended in a harness following a fall, even without any other injury. When a worker hangs motionless in a harness, the leg straps compress the femoral veins in the legs, impeding blood return to the heart. Blood pools in the legs, reducing circulation to the brain and vital organs. Within minutes — sometimes as few as three to five minutes in susceptible individuals, though the timeline varies — the worker can lose consciousness. If not rescued promptly and placed in a horizontal position, suspension trauma can lead to cardiac arrest and death. The harness itself does not cause the injury — it is the immobility of hanging suspension that does. For harness users, understanding suspension trauma has two practical implications.
First, it reinforces why rescue plans must be in place before any elevated work begins — not after a fall occurs. A worker who has fallen and is suspended must be reached and recovered within minutes, not after the crew figures out what to do. Second, workers should be trained in suspension trauma relief positions: if conscious and able to do so following a fall, pushing against the structure, using foot loops, or otherwise relieving pressure on the legs can buy critical time until rescue arrives. Every fall protection program should include a written rescue plan, specific to the work area and anchor system in use, that defines who responds, what equipment is used, and how the recovered worker is treated — including positioning them in a modified recovery position rather than sitting or standing them upright immediately after rescue.
Does OSHA require specific training on safety harness fitting and fall protection?
Yes. OSHA requires that workers exposed to fall hazards be trained by a competent person before they are exposed to those hazards. The training must cover recognition of fall hazards in the work area and the procedures to follow to minimize those hazards. For personal fall arrest systems specifically, the training must address the correct use and limitations of the equipment — which explicitly includes how to don, adjust, and inspect the harness, how to select and test anchor points, and the procedures to follow after a fall. Importantly, OSHA requires retraining whenever there is reason to believe the worker does not have the understanding or skill required — this can be triggered by observed unsafe behavior, a near-miss or incident, a change in equipment or work conditions, or the passage of time without refresher training.
OSHA does not specify a mandatory annual retraining interval in most fall protection standards, but annual refresher training is considered best practice and is required under some state OSHA plans. Training records should document who was trained, who conducted the training, the date, and the topics covered. Generic online training that covers fall protection concepts broadly is not a substitute for hands-on, site-specific training where workers actually don and adjust the specific harness they will use on the job — fitting a harness correctly is a physical skill that must be practiced, not just described.


See how SafetyIQ helps simplify EHS management and builds a stronger safety culture.


.png)